Automating Video Transition Creation in Blender Using Python

Table Of Content
By CamelEdge
Updated on Sat Sep 21 2024
Introduction
Blender is a powerful tool for 3D modeling and animation, but it can also be automated using Python scripts to create more complex animations and effects. In this blog, I will walk you through how you can create a video transition effect using a Python script using the Blender Python module Bpy
Prerequisites
Before diving into the code, make sure to install Blender python module.
python -m pip install bpy
What We'll Achieve
The goal of this tutorial is to create a smooth transition effect between different images using an animated grid of vertices, where each image seamlessly blends into the next. We'll accomplish this by manipulating the grid's vertices and blending the images over time with keyframes, ultimately rendering the animation as a video.
By following this tutorial and running the provided Python script, you'll automate the entire transition effect—eliminating the need to manually interact with Blender—while achieving the same visually stunning result shown in the video below.
Step 1: Setting Up the Environment
The script begins by importing the necessary libraries and modules. These libraries allow us to manipulate objects, create materials, and handle animation tasks inside Blender.
import bpy
import bmesh
import random
import math
import os
from datetime import datetime
- bpy: Blender’s Python API, allowing you to automate actions inside Blender.
- bmesh: A Blender mesh manipulation module for geometry handling.
- random: To create random effects on vertex manipulation.
and some other imports.
Step 2: Creating Materials for Image Transitions
The first function we write is create_material_with_images(). This function creates a material that can blend multiple images together using a set of MixRGB nodes. Blender materials can use various textures, and this function leverages that by loading images and setting them as textures.
def create_material_with_images(image_paths):
    material = bpy.data.materials.new(name="GridMaterial")
    material.use_nodes = True

    nodes = material.node_tree.nodes
    links = material.node_tree.links

    for node in nodes:
        nodes.remove(node)

    output_node = nodes.new(type="ShaderNodeOutputMaterial")
    bsdf_node = nodes.new(type="ShaderNodeBsdfPrincipled")
    mapping_node = nodes.new(type="ShaderNodeMapping")
    tex_coord_node = nodes.new(type="ShaderNodeTexCoord")

    links.new(tex_coord_node.outputs['Generated'], mapping_node.inputs['Vector'])
Here’s what happens:
- We create a new material and enable node-based material creation.
- We add necessary nodes (
Output,Principled BSDF,Mapping, andTexture Coordinate). - The
Mappingnode ensures that the textures are applied uniformly to the grid.
Blending Multiple Images
If there’s more than one image, we blend them using MixRGB nodes:
    previous_output = None
    for i, image_path in enumerate(image_paths):
        tex_image_node = nodes.new(type="ShaderNodeTexImage")
        tex_image_node.image = bpy.data.images.load(image_path)
        links.new(mapping_node.outputs['Vector'], tex_image_node.inputs['Vector'])

        if i == 0:
            previous_output = tex_image_node.outputs['Color']
        else:
            mix_rgb_node = nodes.new(type="ShaderNodeMixRGB")
            mix_rgb_node.blend_type = 'MIX'
            mix_rgb_node.inputs['Fac'].default_value = 0.5
            links.new(previous_output, mix_rgb_node.inputs['Color1'])
            links.new(tex_image_node.outputs['Color'], mix_rgb_node.inputs['Color2'])
            previous_output = mix_rgb_node.outputs['Color']
- Each image is loaded and applied to the grid.
- If there are multiple images, they are blended together using the
MixRGBnode'sFacinput. TheFacinput determines the blending factor between the two images:- Setting
Facto 0 will render only the first image. - Setting
Facto 1 will render only the second image. - Values between 0 and 1 will blend the two images proportionally, creating a smooth transition effect.
- Setting
The complete function create_material_with_images(image_paths) is given below:
def create_material_with_images(image_paths):
    # Create a new material
    material = bpy.data.materials.new(name="GridMaterial")
    material.use_nodes = True

    # Get the material's node tree
    nodes = material.node_tree.nodes
    links = material.node_tree.links

    # Clear all default nodes
    for node in nodes:
        nodes.remove(node)

    # Create necessary nodes
    output_node = nodes.new(type="ShaderNodeOutputMaterial")
    bsdf_node = nodes.new(type="ShaderNodeBsdfPrincipled")
    bsdf_node.inputs['Metallic'].default_value = 1.0
    bsdf_node.inputs['Roughness'].default_value = 1.0
    mapping_node = nodes.new(type="ShaderNodeMapping")
    tex_coord_node = nodes.new(type="ShaderNodeTexCoord")

    # Link the Texture Coordinate node to the Mapping node
    links.new(tex_coord_node.outputs['Generated'], mapping_node.inputs['Vector'])

    mixers = []

    if len(image_paths) == 1:
        tex_image_node = nodes.new(type="ShaderNodeTexImage")
        tex_image_node.image = bpy.data.images.load(image_paths[0])
        links.new(mapping_node.outputs['Vector'], tex_image_node.inputs['Vector'])
        links.new(tex_image_node.outputs['Color'], bsdf_node.inputs['Emission Color'])
        #links.new(tex_image_node.outputs['Color'], bsdf_node.inputs['Emission']) # [use this if bpy=3.6.0]
    else:
        previous_output = None
        for i, image_path in enumerate(image_paths):
            tex_image_node = nodes.new(type="ShaderNodeTexImage")
            tex_image_node.image = bpy.data.images.load(image_path)
            links.new(mapping_node.outputs['Vector'], tex_image_node.inputs['Vector'])

            if i == 0:
                previous_output = tex_image_node.outputs['Color']
            else:
                mix_rgb_node = nodes.new(type="ShaderNodeMixRGB")
                mix_rgb_node.blend_type = 'MIX'
                mix_rgb_node.inputs['Fac'].default_value = 0.5
                mixers.append(mix_rgb_node)

                links.new(previous_output, mix_rgb_node.inputs['Color1'])
                links.new(tex_image_node.outputs['Color'], mix_rgb_node.inputs['Color2'])

                previous_output = mix_rgb_node.outputs['Color']

        links.new(previous_output, bsdf_node.inputs['Emission Color'])
        #links.new(previous_output, bsdf_node.inputs['Emission']) # [use this if bpy=3.6.0]
    # Use a Value node for Emission Strength
    value_node = nodes.new(type="ShaderNodeValue")
    value_node.outputs[0].default_value = 1.0
    links.new(value_node.outputs[0], bsdf_node.inputs['Emission Strength'])

    # Link nodes
    links.new(bsdf_node.outputs['BSDF'], output_node.inputs['Surface'])

    return material, mixers
Step 3: Adding Keyframes for Animating the Grid and Images
To animate the transition between the images, we need to define keyframes. We create two functions for this: one to add keyframes for the blending of images and another to manipulate the vertices of the grid.
def add_keyframes_for_mixers(mixers, frame_numbers, offset):
    for mixer, frame in zip(mixers, frame_numbers):
        mixer.inputs['Fac'].default_value = 0.0
        mixer.inputs['Fac'].keyframe_insert(data_path="default_value", frame=frame - offset)
        mixer.inputs['Fac'].default_value = 1.0
        mixer.inputs['Fac'].keyframe_insert(data_path="default_value", frame=frame + offset)
This function sets keyframes to control the mixing factor of the MixRGB node. It animates the transition between images, making one image fade out as the other fades in.
For the vertex animation, we manipulate the Z-coordinates of the grid’s vertices to create a 3D "pop-up" effect:
def add_keyframes_for_vertices(obj, frame_numbers, offset):
    mesh = obj.data
    for frame in frame_numbers:
        for face in mesh.polygons:
            random_z = random.uniform(0, 10)

            for vertex_index in face.vertices:
                vertex = mesh.vertices[vertex_index]
                vertex.co.z = 0
                vertex.keyframe_insert(data_path="co", index=2, frame=frame - offset)

            for vertex_index in face.vertices:
                vertex = mesh.vertices[vertex_index]
                vertex.co.z = random_z
                vertex.keyframe_insert(data_path="co", index=2, frame=frame)

            for vertex_index in face.vertices:
                vertex.co.z = 0
                vertex.keyframe_insert(data_path="co", index=2, frame=frame + offset)
- The Z-coordinate of each vertex is animated to create a random 3D effect.
- The vertices are first keyframed to stay at Z=0, then randomly elevated, and then set back to Z=0 after the transition.
This is how it will change the vertex to make transition between to images.
Step 4: Setting Up the Camera and Render Parameters
Before we render the animation, we need to set up the camera and define the output settings for the video. The set_up_output_params() function handles this:
def set_up_output_params(output_folder):
    scene = bpy.context.scene
    scene.frame_end = frame_end

    # placing the camera
    camera_data = bpy.data.cameras.new(name="Camera")
    camera_object = bpy.data.objects.new("Camera", camera_data)
    bpy.context.collection.objects.link(camera_object)
    bpy.context.scene.camera = camera_object

    # Set the focal length to 50 mm
    camera_object.data.lens = 50
    # Calculate the distance to plaae the camera so that the image plane is in the field of view
    fov = camera_object.data.angle
    distance = (2*scale * aspect_ratio) / (2 * math.tan(fov / 2))
    camera_object.location = (0, 0, distance)
    scene.render.resolution_y = height
    scene.render.resolution_x = width
    scene.render.resolution_percentage = 100

    scene.camera.data.sensor_fit = 'HORIZONTAL'
    scene.eevee.use_bloom = True
    scene.eevee.use_ssr = True
    scene.camera.data.passepartout_alpha = .9

    scene.view_settings.view_transform = 'Standard'

    scene.world.color = (0, 0, 0)
    scene.render.fps = fps
    scene.render.image_settings.file_format = "FFMPEG"
    scene.render.ffmpeg.format = "MPEG4"
    scene.render.ffmpeg.codec = "H264"
    scene.render.ffmpeg.constant_rate_factor = "MEDIUM"

    now = datetime.now()
    time = now.strftime("%H-%M-%S")
    filepath = os.path.join(output_folder, f"anim_{time}.mp4")
    scene.render.filepath = filepath
This code:
- Sets up a camera with a 50mm lens.
- Positions the camera at the right distance to capture the full grid.
- Configures the rendering settings, including resolution, frame rate, and output format.
Step 5: Creating the Grid
First, we define several parameters for the animation:
image_paths: A list of image file paths to be used in the animation.frame_numbers: A list of frame numbers where keyframes will be added.offset: An offset value for the keyframes.heightandwidth: The resolution of the output video.aspect_ratio: The aspect ratio of the video, calculated aswidth / height.fps: Frames per second for the animation.frame_end: The last frame of the animation.scale: A scaling factor for the grid.resolution: The number of faces on the mesh grid.output_path: The directory where the output video will be saved.
Next, we reset the Blender scene by clearing all existing objects. Then, we create a new mesh, apply the material, and add keyframes to animate the transition.
image_paths = ["./tmp/im1.jpg","./tmp/im2.jpg","./tmp/im3.jpg"]
frame_numbers = [50, 150]
offset = 20
height = 1024
width = 1920
aspect_ratio = width/height
fps = 25
frame_end = 200
scale = 10
resolution = 50; # resolution of the number of faces on the mesh
output_path = './output/'

# Clear all objects in the current scene
bpy.ops.object.select_all(action='SELECT')
bpy.ops.object.delete(use_global=False)

# Create a grid mesh
mesh = bpy.data.meshes.new(name="GridMesh")
grid = bpy.data.objects.new(name="Grid", object_data=mesh)
bpy.context.collection.objects.link(grid)

bm = bmesh.new()
bmesh.ops.create_grid(
    bm,
    x_segments=int(resolution*aspect_ratio),
    y_segments=resolution,
    size= 1
)
for v in bm.verts:
  v.co.x *= scale*aspect_ratio
  v.co.y *= scale
# Set position of z randomly for each face Subdivide edges to split the segments Split each face into individual segments
bmesh.ops.split_edges(bm, edges=bm.edges)
bm.to_mesh(mesh)
bm.free()

grid.location = (0, 0, 0)
add_keyframes_for_vertices(grid, frame_numbers, offset+10)

# Create and assign the material to the grid object
material, mixers = create_material_with_images(image_paths)
# Example usage
add_keyframes_for_mixers(mixers, frame_numbers, offset)

if grid.data.materials:
    grid.data.materials[0] = material
else:
    grid.data.materials.append(material)

set_up_output_params(output_path)
- Grid creation: The grid is created and subdivided using the
bmeshmodule. - Animation: Keyframes are added for both the vertex displacement and image blending.
- Rendering: The final step renders the animation as a video using Blender's internal rendering engine.
Step 6: Rendering
Now we can proceed to render our animation. However, if we want to interactively manipulate or change things inside Blender and observe the effects of our code, we can add the following lines and run the entire script within Blender:
bpy.context.view_layer.update()
bpy.context.view_layer.objects.active = grid
grid.select_set(True)

for area in bpy.context.screen.areas:
    if area.type == 'VIEW_3D':
        for space in area.spaces:
            if space.type == 'VIEW_3D':
                space.region_3d.view_perspective = 'CAMERA'
                break

# Switch to the Shader Editor
for area in bpy.context.screen.areas:
    if area.type == 'NODE_EDITOR':
        area.spaces.active.tree_type = 'ShaderNodeTree'
        area.spaces.active.node_tree = material.node_tree
        area.tag_redraw()
        break
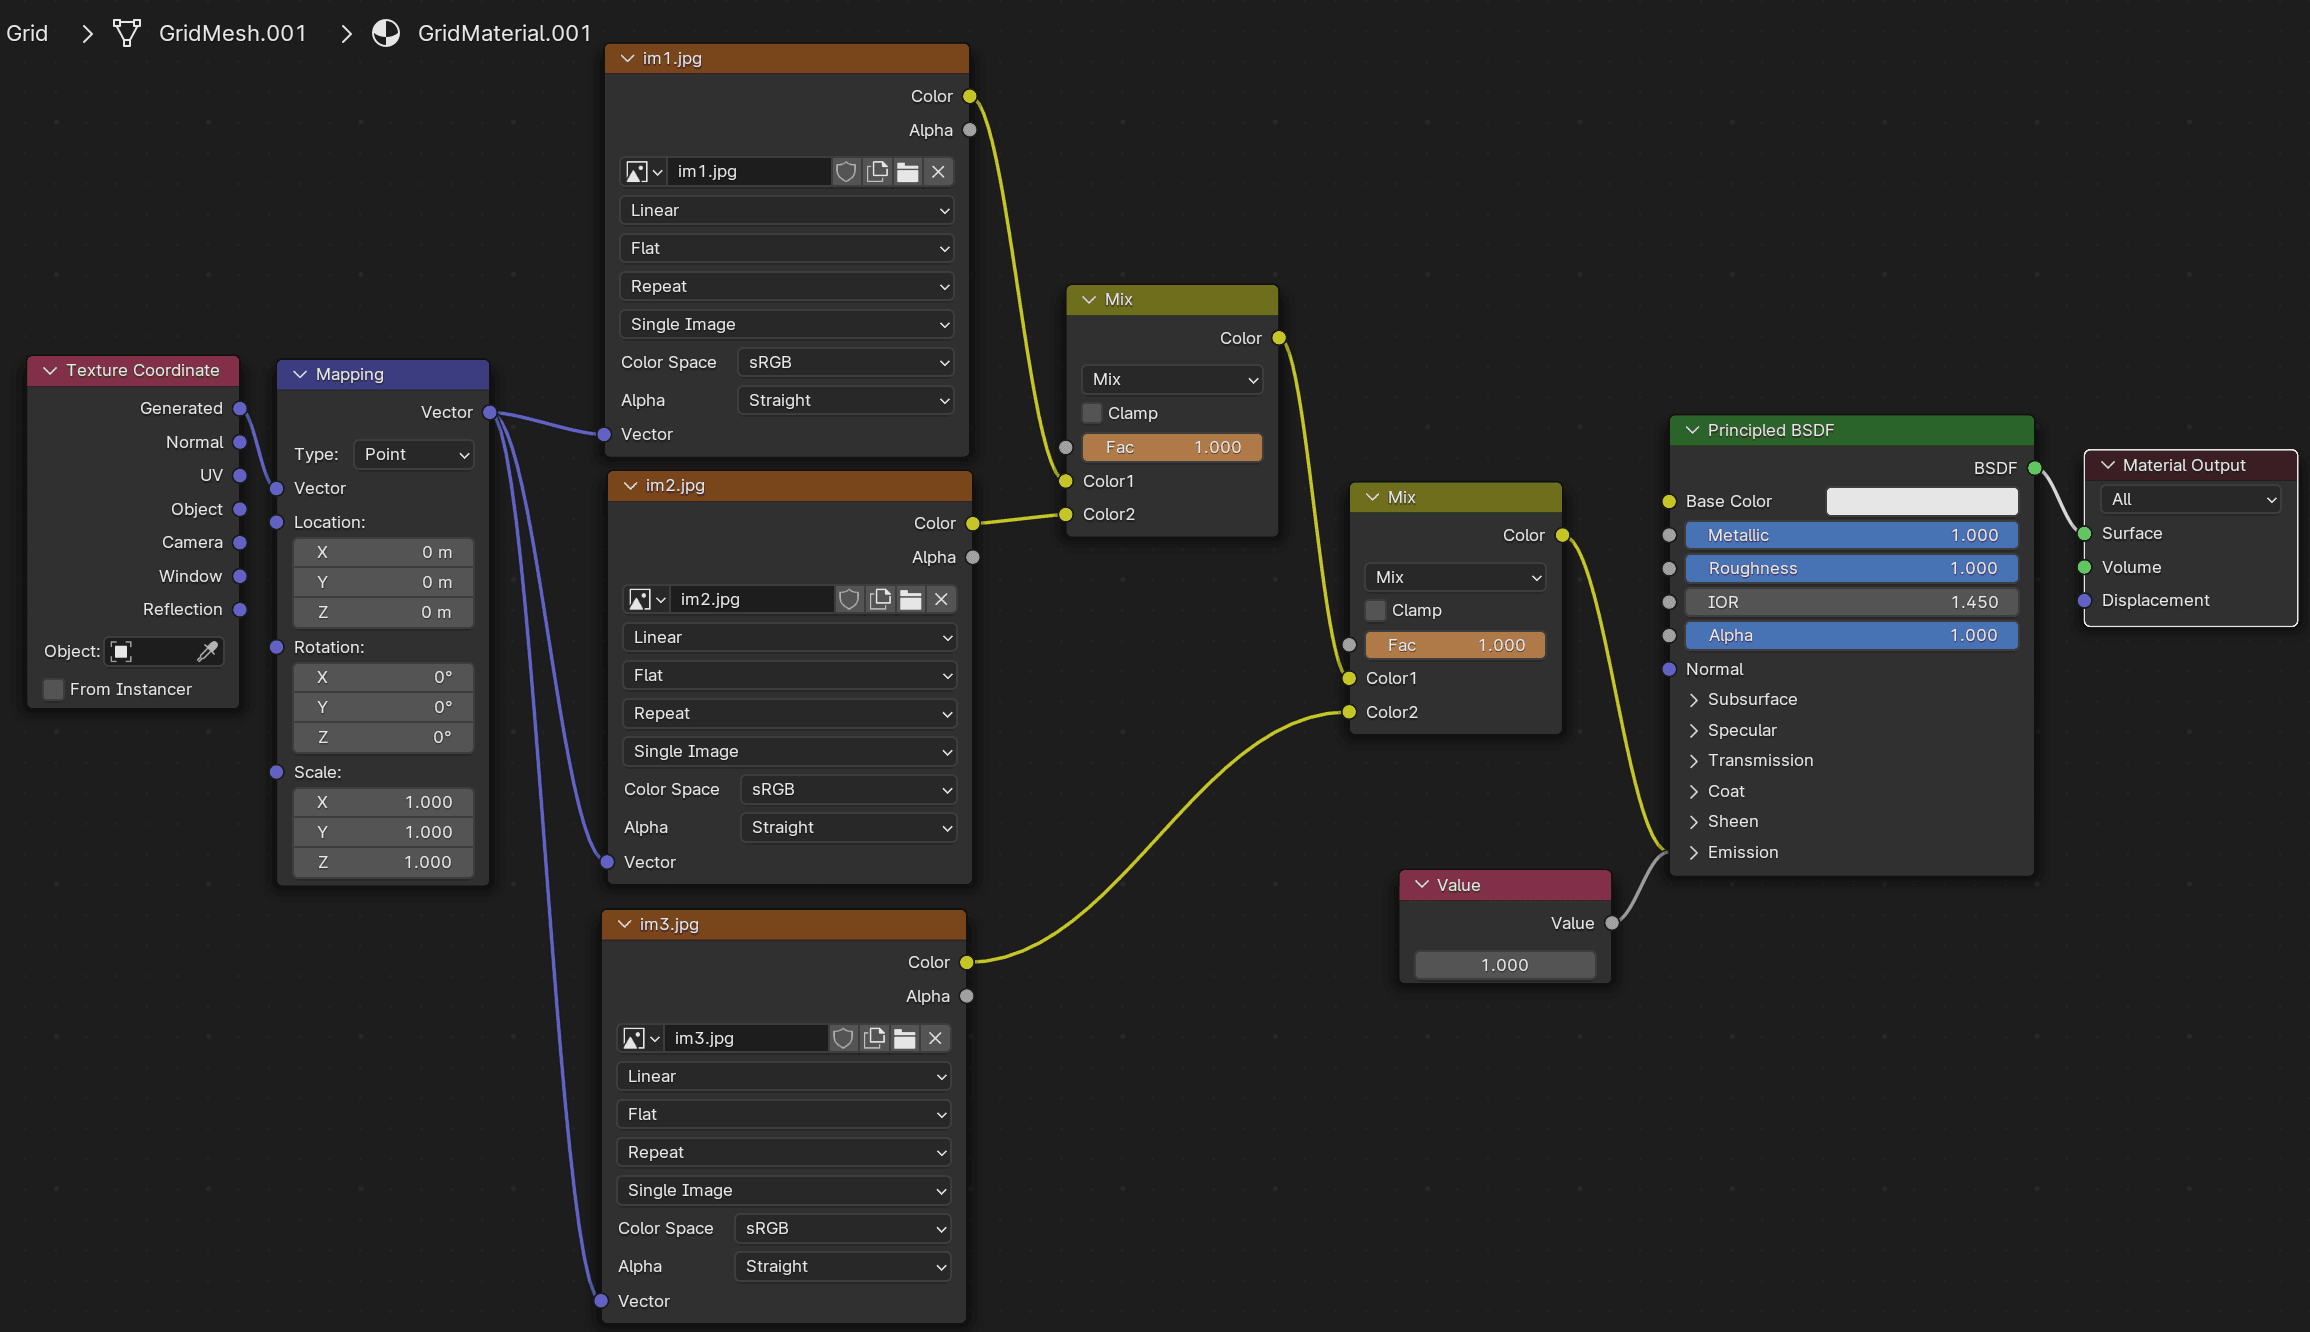
This is the Shader Editor view when the script is executed within Blender. While running the script directly from Blender isn't necessary, you have the flexibility to start with the automated script and later make adjustments to the animation manually within Blender if desired.

To render the animation, use the following command:
bpy.ops.render.render(animation=True)
Conclusion
With this script, you can create complex video transitions in Blender using Python. By manipulating vertex positions and blending images via keyframes, we can generate smooth transitions between different images.
Feel free to experiment with different grid resolutions, number of images, or frame timing to get different effects!